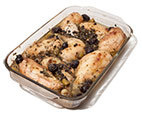
To save time and boost flavor, we ditched the original marinade and
made a paste of the prunes, olives, capers, garlic, and oregano, which
we spread on the chicken and caramelized into the sauce. To boost
meatiness and complexity, we added anchovies and pepper flakes and
browned the chicken skin in a skillet before baking it through.
Serves 4 to 6
Any combination of split breasts and leg quarters can be used in this recipe.
Ingredients:
Paste
1/3
cup pitted green olives, rinsed1/3
cup pitted prunes3
tablespoons extra-virgin olive oil4
garlic cloves, peeled
2
tablespoons capers, rinsed
3
anchovy fillets, rinsed
1/2
teaspoon dried oregano
1/2
teaspoon pepper
1/4
teaspoon kosher salt
Pinch red pepper flakes Chicken
2 1/2 - 3
pounds bone-in, skin-on split chicken breasts and/or leg quarters, trimmed
Kosher salt and pepper
2
teaspoons olive oil
3/4
cup low-sodium chicken broth
1/3
cup white wine
1/3
cup pitted green olives, rinsed and halved
1
tablespoon capers, rinsed
2
bay leaves
1/3
cup pitted prunes, chopped coarse
1
tablespoon unsalted butter
1
teaspoon red wine vinegar
2
tablespoons minced fresh parsley
Preparation:
FOR THE PASTE: Adjust oven rack to middle
position and heat oven to 400 degrees. Pulse all ingredients in food
processor until finely chopped, about ten 1-second pulses. Scrape down
bowl and continue to process until mostly smooth, 1 to 2 minutes.
Transfer to bowl. (Paste can be refrigerated for up to 24 hours.)
FOR THE CHICKEN: Pat chicken dry with paper towels. Sprinkle chicken pieces with 1½ teaspoons salt and season with pepper.
Heat oil in 12-inch skillet over medium-high heat
until just smoking. Add chicken, skin side down, and cook without
moving it until well browned, 5 to 8 minutes. Transfer chicken to large
plate. Drain off all but 1 teaspoon fat from skillet and return to
medium-low heat.
Add 1/3 cup paste to skillet and cook, stirring
constantly, until fragrant and fond forms on pan bottom, 1 to 2 minutes.
Stir in broth, wine, olives, capers, and bay leaves, scraping up any
browned bits. Return chicken to pan, skin side up (skin should be above
surface of liquid), and roast, uncovered, for 15 minutes.
Remove skillet from oven and use back of spoon to
spread remaining paste over chicken pieces; sprinkle prunes around
chicken. Continue to roast until paste begins to brown, breasts register
160 degrees, and leg quarters register 175 degrees, 7 to 12 minutes
longer.
Transfer chicken to serving platter and tent
loosely with aluminum foil. Remove bay leaves from sauce and whisk in
butter, vinegar, and 1 tablespoon parsley; season with salt and pepper
to taste. Pour sauce around chicken, sprinkle with remaining 1
tablespoon parsley, and serve.
Technique
Making Over Marbella
The original chicken Marbella featured chicken parts marinated overnight and then baked.
Problem: Pale, flabby skin Solutions: Ditch the marinade since it turns skin
soggy (and never permeates the flesh anyway). Sear the chicken to crisp
the skin before adding liquid. Problem: Bland meat Solution: Smear a potent paste of capers, garlic,
anchovies, olives, prunes, oregano, and red pepper flakes onto the
chicken after it is seared. Problem: Overly sweet, lackluster sauce Solutions: Eliminate brown sugar and use the
flavorful fond from searing the chicken (plus more caper-prune-olive
paste) to form the base of the sauce. Balance the flavors with butter,
vinegar, and parsley.
Brussels Sprout Salad with Cheddar, Hazelnuts, and Apple
From Cook's Country
Why this recipe works:
Instead of roasted Brussels sprouts, we wanted a light, bright, raw
preparation that was just as delicious. Shredding the Brussels sprouts
super-thin is key, and letting them sit in the dressing for at least 30
minutes softens them fully and seasons them deeply. To flavor the salad,
we chose a simple lemon vinaigrette, rounded out with shallot and
mustard. Sweet fruit, crunchy nuts, and creamy cheese are the finishing
touches.
Serves 8
Slice the sprouts as thin as possible. Shred the cheddar on the large holes of a box grater.
Ingredients
3
tablespoons lemon juice2
tablespoons Dijon mustard1
small shallot, minced1
garlic clove, mincedSalt and pepper6
tablespoons extra-virgin olive oil2
pounds Brussels sprouts, trimmed, halved, and sliced very thin4
ounces sharp cheddar cheese, shredded (1 cup)1
Granny Smith apple, cored and cut into 1/2-inch pieces1/2
cup hazelnuts, toasted, skinned, and chopped
Instructions
Whisk lemon juice, mustard, shallot, garlic and
1/2 teaspoon salt together in large bowl. Slowly whisk in oil until
incorporated. Toss Brussels sprouts with vinaigrette, and let sit for at
least 30 minutes or up to 2 hours.
Fold in cheddar, apple, and hazelnuts. Season with salt and pepper to taste. Serve.
How to Slice Brussels Sprouts
You can use the slicing disk of your food processor or slice
the sprouts with a chef’s knife. Follow these steps to do the latter
safely and quickly.
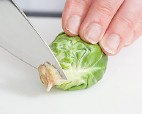
1. Trim: Trim the stem end of each sprout and then cut each sprout in half through the cut end.
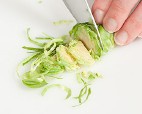
2. Slice: With the flat surface on the cutting board, thinly slice each half.
This spicy dish of eggs, charred chiles, and tortillas makes for an
eye-opening breakfast but is often hard to put together for four people.
For maximum flavor with little effort, we roasted diced tomatoes with
brown sugar, lime juice, green chiles, chili powder, and garlic that we
bloomed in oil in the microwave. We spread that flavorful mixture in a
13 by 9-inch baking dish, made divots in the mixture to hold our eggs
(eight divots in all), sprinkled cheese over the divots, added our eggs,
and baked the eggs for about 15 minutes, until just set. Topped with
avocado, scallion, and cilantro and served with warm corn tortillas,
huevos rancheros will get your day started with a bang.
Serves 4
Use a heavyweight rimmed baking sheet; flimsy sheets will warp. Our
winning sheet is the Wear-Ever Half Size Heavy Duty Sheet Pan (13 gauge)
by Vollrath. Serve with refried beans and hot sauce.
Ingredients
2
(28-ounce) cans diced tomatoes
1
tablespoon packed brown sugar
1
tablespoon lime juice
1
onion, chopped
1/2
cup chopped canned green chiles
1/4
cup extra-virgin olive oil
3
tablespoons chili powder
4
garlic cloves, sliced thin
Salt and pepper
4
ounces pepper jack cheese, shredded (1 cup)
8
large eggs
1
avocado, halved, pitted, and diced
3
scallions, sliced thin
1/3
cup minced fresh cilantro
8
(6-inch) corn tortillas, warmed
Preparation
Adjust oven rack to middle position and heat oven
to 500 degrees. Line rimmed baking sheet with parchment paper. Drain
tomatoes in fine-mesh strainer set over bowl, pressing with rubber
spatula to extract as much juice as possible. Reserve 1 3/4 cups tomato
juice and discard remainder. Whisk sugar and lime juice into reserved
tomato juice and set aside.
In separate bowl, combine onion, chiles, oil,
chili powder, garlic, 1/2 teaspoon salt, and drained tomatoes. Transfer
tomato mixture to prepared baking sheet and spread in even layer to
edges of sheet. Roast until charred in spots, 35 to 40 minutes, stirring
and redistributing into even layer halfway through baking. Reduce oven
temperature to 400 degrees.
Transfer roasted tomato mixture to 13 by 9-inch
baking dish and stir in tomato juice mixture. Season with salt and
pepper to taste, then spread into even layer. Sprinkle pepper Jack over
tomato mixture. Using spoon, hollow out 8 holes in tomato mixture in 2
rows. Crack 1 egg into each hole. Season eggs with salt and pepper.
Bake until whites are just beginning to set but
still have some movement when dish is shaken, 13 to 16 minutes. Transfer
dish to wire rack, tent loosely with aluminum foil, and let sit for 5
minutes. Spoon avocado over top, then sprinkle with scallions and
cilantro. Serve with warm tortillas.
TO MAKE AHEAD: The sauce can be made 24 hours in advance. Microwave until hot, about
2 minutes (stirring halfway), before transferring to baking dish and proceeding with recipe.Roast the Vegetables; Bake the Eggs
To evoke the charred flavors in traditional huevos rancheros, we
roast vegetables in a hot oven before layering them into a baking dish
with cheese sprinkled over. Cracking eggs into wells in the mixture
allows us to bake eight servings at once—no more standing at the stove
frying egg after egg for an impatient crowd.
so, i threw this together last night after reading several meatloaf recipes online (largely using ina garten's for flavor profile). all amounts approximated.
4 hearty servings
somebody else's rando turkey meatloaf, but mine looked pretty similar, though cut into a wedge, not a slice.
Ingredients
1 lb 93% lean ground turkey
< 1/4 of an onion, chopped (i used purple, but i think yellow would be even better)
c. 1+ t garlic powder
c. 1+ t onion powder
large pinch dried thyme (fresh would kill)
salt (the more mustard/soy/worcestershire/spices you have, the less salt you'll need; play it by ear)
freshly ground pepper
1 T dijon mustard (i sometimes use stone-ground)
soy sauce (worcestershire would be even better, i think)
1/4+ c ketchup, divided
1 egg, whisked
c. 1 c bread crumbs (i had plain, but i think italian would be fun)
1ish t extra-virgin olive oil
Additional Optional Add-Ins
chopped olive tapenade–type thing (i just happened to have this on hand and thought it was really fun; by no means necessary; or try other savory spreads here. how about pickled veg? chopped artichoke spread?)
chopped fresh parsley (this is the husband's suggestion, and i agree it would be killer)
large-dice hard-boiled egg (also his addition, which i think is brilliant. growing up i knew a family that used to bake whole hard-boiled eggs into
their meatloaf, which i think is amazing. and would make for a killer
'50s-era-looking cross-section, no? i will do this one day.)
ooked, chopped -- so it's not stringy to the bite -- well-seasoned (key!) spinach (be sure all the extra water is squeezed out, or it will eff with your loaf, man)
Preparation
preheat the oven to 325^F.
in a large mixing bowl, gently combine the turkey, chopped onion, garlic powder, onion powder, thyme, maybe 1ish t salt, as many cracks of pepper as appeal, dijon mustard, a few good glugs of soy sauce, 2ish T ketchup, and whisked egg. (if you are adding in additional ingredients -- like the suggested tapenade, fresh parsley, and hard-boiled egg -- now's your cue.)
once the mixture is just barely combined, with a fair distribution of the ingredients, mix in the bread crumbs, using an easy hand. you don't want to overwork the mixture. combine until it feels solid enough to hold together without becoming tough or dry feeling. you may need to add additional bread crumbs 'til you get the right feel (see notes about wet vs. dry ingredients below). just experiment.
oil the bottom of a square 8" x 8" cake pan (or really any oven-safe vessel that will give your meat goodness room to breathe -- i say this because if you use the traditional loaf pan i can't be sure how the temp and times will change). place the meat mixture into it, patting it into an even circle (or, really, whatever damned shape you fancy). spread another 2ish T ketchup on the top of the loaf.
bake in the middle of the oven for 40 to 50 minutes. you want the meat to hold together nicely without any pink remaining, but you don't want to overcook, or it will become dry and tough. i don't have a meat thermometer and so just cut the whole thing in half when i suspected it was done to check it; imperfect but effective.
serve with something super nummy like mashed potatoes and a simple salad. note that this loaf is tasty hot out of the oven, at room temperature, or even cold (especially in a sandwich). vee obliging, this turkey meatloaf.
A Word On Breadcrumbs
the more dry
ingredients you have -- any grated cheeses, chopped eggs, abundant
spices and herbs, etc. -- the less breadcrumb you'll need; the more wet
ingredients -- soy/worcestershire, mustard, egg, etc. -- the more
breadcrumb you'll need.
Tyler Florence's Chive and Garlic Mashed Potatoes serves 4 to 6
Ingredients
6 to 8 large Yukon gold potatoes, peeled and quartered 1 tablespoon salt 4 bay leaves 1 cup heavy cream 1/2 stick (1/4 cup) butter 4 cloves garlic, lightly crushed 3 sprigs fresh thyme Kosher salt and freshly ground black pepper 2 tablespoons chopped chives
Preparation
Put the cut potatoes into a large pot, cover them with cold water,
and add salt and 2 bay leaves. Bring to a boil and simmer until the
potatoes are fork tender, about 20 to 30 minutes. Drain well and remove
the bay leaves.
Meanwhile, in a small pot heat the cream, butter,
garlic, thyme, and remaining bay leaves. While the potatoes are still
warm, press them through a potato ricer or food mill into a mixing bowl.
Add the warm cream, straining out the solids, a bit at a time until the
potatoes are fluffy. Season with salt and pepper and gently stir in the
chives. Serve immediately.
Tyler Florence's Test Kitchen Stuffing Makes enough to stuff one turkey.
Ingredients 4 cupsSourdough Bread (torn into 1" pieces, without the crusts) 2 tablespoonsGrapeseed or Vegetable oil 1/2 poundSage Breakfast Sausage (crumbled) 1/2 cup Diced Carrots 1/2 cupDiced Celery 1/2 cup Diced Onion 5 Sage Leaves 3 Thyme Sprigs Kosher Salt Freshly Ground Black Pepper 2/3 cupChicken Stock 1 Egg Preparation
Preheat the oven to 375°F. Toast the Bread on a sheet pan in the oven for about 15 minutes until crisp and golden.
Heat
the Oil over medium-high heat in a large saucepan then add the Sausage
and let it brown. After it's nice and golden on one side, stir to get
color all over. Add the Carrots, Celery, and Onion, followed by the Sage
and Thyme. Turn the heat down to medium and cook, stirring
occasionally, to keep the cooking even. Season with Salt and Pepper.
When the vegetables are aromatic and tender, add a splash of Water if
necessary to loosen the brown bits from the bottom of the pan. Add the
Toasted Bread and the Chicken Stock and mix.
Remove
the Thyme Sprigs and pull the Leaves off. Add the Leaves back to the
stuffing and then transfer the stuffing to a food processor. Process
until fairly smooth, adding the Egg while pureeing (if you're doubling
the recipe for extra stuffing, puree only half the stuffing; the rest
you can bake as directed below).
Transfer the stuffing to a piping bag (or a large zip top bag with a comer snipped off).
If
you would like to have the stuffing as a stand-alone dish, skip the
pureeing. Transfer the stuffing mixture to a greased baking dish and
cook in a 350°F oven until the top is golden brown.
Brining chicken pieces plumped the meat with extra moisture—a boon in
a grill-smoked chicken recipe, in which the meat is prone to drying
out. The key to our successful Grill-Smoked Chicken recipe was the
charcoal grill setup. Mounding some lit coals on top of unlit briquettes
on one side of the grill allowed the heat to trickle down and light the
cold coals, extending the life of the fire. Stowing a pan of water
under the chicken on the cool side of the grill provided humidity that
stabilized the temperature of the grill and helped prevent the delicate
breast meat in our grill-smoked chicken from drying out. A couple of
wood chunks gave our grill-smoked chicken all the smokiness it needed.
Serves 6 to 8
Avoid mesquite wood chunks for this recipe: we find that the meat can
turn bitter if they smolder too long. When using a charcoal grill, we
prefer wood chunks to wood chips whenever possible. If using a gas
grill, you will need to use wood chips.
Ingredients
1
cup salt1
cup sugar6
pounds bone-in chicken parts (breasts, thighs, and drumsticks), trimmed3
tablespoons vegetable oilPepperLarge disposable aluminum roasting pan (if using charcoal) or disposable aluminum pie plate (if using gas)2
wood chunks soaked in water for 30 minutes and drained (if using
charcoal) or 3 cups wood chips, half of chips soaked in water for 30
minutes and drained (if using gas)
Preparation
Dissolve salt and sugar in 4 quarts cold water in
large container. Submerge chicken in brine, cover, and refrigerate for
30 minutes to 1 hour. Remove chicken from brine and pat dry with paper
towels. Brush both sides of chicken with oil and season with pepper.
For a Charcoal Grill: Open bottom vent halfway.
Arrange disposable pan filled with 2 cups water on 1 side of grill and 2
quarts unlit charcoal briquettes against empty side of grill. Light
large chimney starter filled halfway with charcoal briquettes (3
quarts). When top coals are partially covered with ash, pour on top of
unlit briquettes, keeping coals steeply banked against side of grill.
Place wood chunks on top of coals. Set cooking grate in place, cover,
and open lid vent halfway. Heat grill until hot and wood chunks begin to
smoke, about 5 minutes.
For a Gas Grill: Use large piece of heavy-duty
aluminum foil to wrap soaked chips into foil packet and cut several vent
holes in top. Wrap unsoaked chips in second foil packet and cut several
vent holes in top. Place wood chip packets directly on primary burner.
Place disposable pie plate with 2 cups water on other burner(s). Turn
all burners to high, cover, and heat grill until hot and wood chips
begin to smoke, about 15 minutes. Turn primary burner to medium-high and
turn off other burner(s).
Clean and oil cooking grate. Place chicken, skin
side up, as far away from fire as possible with thighs closest to fire
and breasts furthest away. Cover (positioning lid vent over chicken if
using charcoal) and cook until breasts register 160 degrees and
thighs/drumsticks register 175 degrees, 1 1/4 to 1 1/2 hours.
Transfer chicken to cutting board, tent loosely with foil, and let rest for 5 to 10 minutes before serving.
Technique
Don't Oversmoke Your Chicken
To infuse our chicken pieces with full-bodied smoke flavor, we
figured it was necessary to keep the wood chunks smoldering for the
entire time that the meat was on the grill. But when the finished
product tasted not just smoky, but also harsh and ashy, we wondered: Was
there a limit to the amount of smoke that the chicken could take?
Experiment We smoked two batches of chicken. For the first, we added two soaked
wood chunks to the fire at the beginning of cooking; when those had
burned out about 45 minutes later, we added two more soaked chunks to
keep the smoldering going for the duration of cooking. For the second
batch, we didn’t replenish the wood after the initial chunks had burned
out.
Results The chicken exposed to smoke the entire time tasted bitter and sooty,
while the pieces that were exposed to smoke for only 45 minutes or so
(about half of the overall cooking time) had just enough smoky depth.
Explantion Smoke contains both water- and fat-soluble compounds. As the chicken
cooks, water evaporates and fat drips away, eventually halting meat’s
capacity to continue absorbing smoke flavor. Once that happens, any
additional smoke flavor that’s not absorbed by the meat gets deposited
on the exterior of the chicken, where the heat of the grill breaks it
down into harsher—flavored compounds.
One round of wood chunks = Balanced smokiness
Technique
Smoking Chicken in a Charcoal Kettle
To produce tender, juicy, smoky chicken, we devised a
three-part fire setup in our charcoal kettle. It mimics the slow,
steady, indirect heat that pit masters get from a dedicated smoker, plus
it avoids sooty flavors.
TWO QUARTS OF UNLIT COALS Bank to one side of the
grill with 3 quarts of lit coals piled on top to keep the fire going
without it being necessary to open the lid. A WATER PAN Place underneath the grill grate
opposite the coals to create steam, which helps stabilize the
temperature and keep the meat moist.
TWO SOAKED WOOD CHUNKS Place on top of the coals smoldered for about 45 minutes—just long enough to infuse the chicken with smoky (not sooty) flavor.
Our first few tests of Summer Tomato Pie made it clear that while
juiciness is the strength of a good tomato, it’s the enemy of tomato
pie. The wet tomatoes created a soaked, doughy bottom crust. To
eliminate moisture, we salted the tomatoes and let them sit to draw out
their juice. After the slices drained, we pressed them firmly with paper
towels, layered them in the pie, and cut large vents in the top crust
for steam to escape. Adding cornstarch to the filling and lowering the
oven heat after a few minutes prevented the mayonnaise from curdling.
Serves 8
Use our recipe for Double-Crust Pie Dough (related), or use your own
recipe or store-bought dough. If using store-bought dough, bake the pie
for 30 minutes after turning down the heat in step 4.
Ingredients
2
(9-inch) pie dough rounds (see note)2
pounds ripe beefsteak tomatoes (about 4 large), cored and cut into 1/4-inch slices1/2
teaspoon salt1/4
cup mayonnaise4
teaspoons cornstarch1 1/2
cups grated sharp cheddar cheese4
scallions, sliced thin
Preparation
DRAIN TOMATOES: Arrange tomatoes on paper
towel-lined baking sheet and sprinkle with salt. Let drain 30 minutes,
then press tomatoes with additional paper towels until very dry.
ROLL DOUGH: On lightly floured surface, roll 1
dough round into 12-inch circle (if using store-bought dough, you do not
need to roll either crust). Transfer to 9-inch pie plate, letting
excess hang over edge. Cover with plastic and refrigerate 30 minutes.
Roll second round into 12-inch circle and refrigerate for 30 minutes.
ASSEMBLE PIE: Adjust oven rack to lowest position
and heat oven to 450 degrees. Mix mayonnaise, cornstarch, and 1 cup
cheese in bowl until well combined. Sprinkle remaining cheese over
bottom of dough-lined pie plate. Arrange third of tomatoes over cheese.
Spread half of mayonnaise mixture over tomatoes and sprinkle with half
of scallions. Layer with another third of tomatoes, remaining mayonnaise
mixture, and remaining scallions, then top with remaining tomatoes.
CRIMP CRUST: Arrange top crust on pie. Press
crusts together, then trim, fold, and crimp edges. Cut four 2- by 1-inch
oval vent holes in top. Place pie on rimmed baking sheet, bake for 10
minutes, then lower oven temperature to 325 degrees and bake until crust
is golden brown, about 55 minutes. Cool on wire rack at least 3 hours.
Serve at room temperature.
Keys to Crispy Crust
As they cook, juicy summer tomatoes expel so much moisture they turn pie shells sodden. Prevent slush with our three-step plan.
1. Salt the tomatoes and let them drain for 30 minutes. Then press on them firmly with paper towels to dry them.
2. Before filling the pie, sprinkle 1/2 cup of cheese over the bottom of the pie shell to protect the crust from the wet tomatoes.
3. Cut oval vent holes in the top crust so steam can escape. Place on a preheated baking sheet to set the bottom crust.
For our lobster roll, we mostly adhered to tradition—top-loading
supermarket hotdog bun, mayonnaise, and lots of lobster—but we added a
hint of crunch in the form of small amounts of lettuce and celery, and
we added complimentary brightness with lemon juice, cayenne, and chives.
The sandwich is easy. The challenges are dealing with a live lobster and knowing when it’s properly cooked.
Serves 6
This recipe is best when made with lobster you’ve cooked yourself.
Use a very small pinch of cayenne pepper, as it should not make the
dressing spicy. We prefer New England–style top-loading hot dog buns, as
they provide maximum surface on the sides for toasting. If using other
buns, butter, salt, and toast the interior of each bun instead of the
exterior.
Ingredients
2
tablespoons mayonnaise
2
tablespoons minced celery
1 1/2
teaspoons lemon juice
1
teaspoon minced fresh chives
Salt
Pinch cayenne pepper
1
pound lobster meat, tail meat cut into 1/2-inch pieces and claw meat cut into 1-inch pieces
6
New England-style hot dog buns
2
tablespoons unsalted butter, softened
6
leaves Boston lettuce Preparation
Whisk mayonnaise, celery, lemon juice, chives,
1/8 teaspoon salt, and cayenne together in large bowl. Add lobster and
gently toss to combine.
Place 12-inch nonstick skillet over low heat.
Butter both sides of hot dog buns and sprinkle lightly with salt. Place
buns in skillet, with 1 buttered side down; increase heat to medium-low;
and cook until crisp and brown, 2 to 3 minutes. Flip and cook second
side until crisp and brown, 2 to 3 minutes longer. Transfer buns to
large platter. Line each bun with lettuce leaf. Spoon lobster salad into
buns and serve immediately.
dj's note: i couldn't handle adding ATK's how-to-kill-a-lobster instructions, because i'm a big hypocrite: i'll eat it, but i cringe from killing it myself.
Eggplant involtini recipes are often just eggplant Parmesan
in a more complicated form: fried eggplant, milky cheese filling, and
lots of sauce, with a blanket of mozzarella. We wanted a lighter, more
summery dish that focused on the eggplant. Baking the eggplant instead
of frying it allows us to skip the salting and draining step, since the
eggplant’s excess moisture evaporates in the oven, and it means that the
eggplant’s flavor and meaty texture are not obscured by oil and
breading. Swapping the usual ricotta-heavy filling for one that’s
boosted with a generous dose of Pecorino Romano means we can use less
filling without sacrificing flavor. Lastly, we make a simple but
complementary tomato sauce in a skillet, add the eggplant bundles to it,
and finish it under the broiler, which decreases the number of dishes
required.
The classic approach to these cheese-filled eggplant rolls—breading and
frying—is tedious, and it obscures the signature ingredient. We ditched
both steps for a lighter, less fussy dish.
Serves 4 to 6
Note: Select shorter, wider eggplants for this recipe. Part-skim ricotta
may be used, but do not use fat-free ricotta. Serve the eggplant with
crusty bread and a salad.
Ingredients
2
large eggplants (1 1/2 pounds each), peeled
6
tablespoons vegetable oil
Kosher salt and pepper
2
garlic cloves, minced
1/4
teaspoon dried oregano
Pinch red pepper flakes
1
(28-ounce) can whole peeled tomatoes, drained with juice reserved, chopped coarse
1
slice hearty white sandwich bread, torn into 1-inch pieces
8
ounces (1 cup) whole-milk ricotta cheese
1 1/2
ounces grated Pecorino Romano cheese (3/4 cup)
1/4
cup plus 1 tablespoon chopped fresh basil
1
tablespoon lemon juice
Preparation
Slice each eggplant lengthwise into
1/2-inch-thick planks (you should have 12 planks). Trim rounded surface
from each end piece so it lies flat.
Adjust 1 oven rack to lower-middle position and
second rack 8 inches from broiler element. Heat oven to 375 degrees.
Line 2 rimmed baking sheets with parchment paper and spray generously
with vegetable oil spray. Arrange eggplant slices in single layer on
prepared sheets. Brush 1 side of eggplant slices with 2 1/2 tablespoons
oil and sprinkle with 1/2 teaspoon salt and 1/4 teaspoon pepper. Flip
eggplant slices and brush with 2 1/2 tablespoons oil and sprinkle with
1/2 teaspoon salt and 1/4 teaspoon pepper. Bake until tender and lightly
browned, 30 to 35 minutes, switching and rotating sheets halfway
through baking. Let cool for 5 minutes. Using thin spatula, flip each
slice over. Heat broiler.
While eggplant cooks, heat remaining 1 tablespoon
oil in 12-inch broiler-safe skillet over medium-low heat until just
shimmering. Add garlic, oregano, pepper flakes, and 1/2 teaspoon salt
and cook, stirring occasionally, until fragrant, about 30 seconds. Stir
in tomatoes and their juice. Increase heat to high and bring to simmer.
Reduce heat to medium-low and simmer until thickened, about 15 minutes.
Cover and set aside.
Pulse bread in food processor until finely
ground, 10 to 15 pulses. Combine bread crumbs, ricotta, 1/2 cup
Pecorino, 1/4 cup basil, lemon juice, and 1/2 teaspoon salt in medium
bowl.
With widest ends of eggplant slices facing you,
evenly distribute ricotta mixture on bottom third of each slice. Gently
roll up each eggplant slice and place seam side down in tomato sauce.
Bring sauce to simmer over medium heat. Simmer
for 5 minutes. Transfer skillet to oven and broil until eggplant is well
browned and cheese is heated through, 5 to 10 minutes. Sprinkle with
remaining 1/4 cup Pecorino and let stand for 5 minutes. Sprinkle with
remaining 1 tablespoon basil and serve.
Bake, Don't Fry
We trade the salting, breading, and frying steps that classic recipes employ for a lighter, no-fuss approach.
1. SLICE: Lay each peeled eggplant on its side and slice it lengthwise into 1/2-inch-thick planks (you should have 12 planks).
2. BAKE: Brush both sides of slices with oil, season with salt and pepper, and bake until tender and lightly browned, about 30 minutes.
3. STUFF AND ROLL: With widest end facing you, place portion of ricotta mixture on bottom third of slice. Roll into cylinder.
Bread Crumbs: Outside to Inside
In most involtini recipes bread crumbs are used to coat the
eggplant, but in our version we put them in the cheese. The bread crumbs
keep the filling creamy by preventing the Pecorino Romano proteins from
linking tightly.
Fisherman-Style Ukha (Fish Soup) recipe courtesy of Irina Vodonos's class on European winter soups at The Pantry at Delancey Note: Ukha is pronounced ooh-CHAH.
yield 4–6 servings
Ingredients First fish: 1 lb cheap, small, bony, preferably freshwater fish (e.g., smelt, sardines, herring) Second fish: 1 lb moderately fatty, larger, preferably freshwater fish (e.g., bone-in catfish, cut into 1 1/2–2-inch chunks) 1 onion, peeled and trimmed 3 yellow potatoes, peeled and cut into 1/2- to 1-inch cubes Third fish: 1 lb top-quality, fatty, preferably freshwater fish (e.g., bone-in sturgeon, salmon, halibut, cut into 1 1/2-inch chunks) 2–3 bay leaves 10 peppercorns freshly ground black pepper, to taste kosher salt, to taste 1 shot (50 ml) vodka, plus more for serving a stick of your favorite wood (use a bunch of bamboo skewers in a pinch), for a smoky flavor small handful of chopped dill (optional
Preparation
Place the first fish in a medium stockpot, cover with 8 c cold water, and bring to a boil. Skim off foam if needed, reduce heat, and simmer 20 m.
Remove first fish from broth, and discard; strain broth if needed. Add the second fish and the onion to the broth, bring back to a boil, reduce heat, and simmer for 20 m. Carefully remove and reserve second fish.
Add potatoes and third fish, bay leaves, and peppercorns to broth. Bring back to a boil, reduce heat, and simmer for 15 m or 'til potatoes are done. Remove and discard onion.
Return reserved second fish to pt. Season soup with salt and ground black pepper to taste.
Now comes the fun part: Light your stick of wood on fire, and let it burn until a good part of it is charred. Extinguish the wood by submerging it in the pot of soup. After a few minutes, remove any charred pieces of wood that may be floating in the soup. Add the vodka and dill (if using), cover, and let soup stand 5–10 m before serving.
Matzo Ball Soup recipe adapted from Lyudmila Abelis and Manischewitz matzo meal, courtesy of Irina Vodonos's class on European winter soups at The Pantry at Delancey
yield: 6–8 servings Ingredients For the soup lean parts of one whole chicken (back, breast, and wings) 1 onion, peeled and trimmed 2 carrots 2 celery ribs 1 parsnip 1 T kosher salt 5–6 stems dill, chopped For matzo balls 4 eggs, lightly beaten 1/4 c schmalz (recipe below) or oil 1 c matzo meal 1 1/2 t kosher salt 1/4 c broth or water Preparation
Place chicken in medium stockpot, and cover with 8 c cold water. Bring to a boil, and skim off foam.
Add vegetables (chop carrots, celery, and parsnip in half, if needed, to fit in pot) and salt, reduce heat to simmer, and cook for about 45 m. Add dill, and cook another 5 m. Remove from heat. Remove and reserve vegetables and chicken from broth. Taste broth, and add more salt if needed.
In a small bowl, beat eggs and schmaltz or oil lightly with a fork. Stir in matzo meal and salt just until combined, then stir in the broth or water. Cover, and refrigerate for 20 m. Bring a pot of salted water to a boil. With wet hands, roll matzo ball mixture into walnut-sized balls, and drop into boiling water. Reduce heat to simmer, cover tightly, and cook 40 m.
To serve, ladle broth into bowls, and add a couple of matzo balls per bowl. Also add vegetables and/or chicken used to make broth if desired.
Homemade Schmaltz and Gribenes recipe by Lyudmila Abelis and Irina Vodonos, courtesy of Vodonos's class on European winter soups at The Pantry at Delancey Note: Gribenes is Yiddish for cracklings, the rendered solids of an animal fat.
Ingredients 1 1/2 t oil fat (and a bit of fatty skin) trimmed from one whole chicken, cut into 1/2-inch pieces 1/4 t kosher salt 1/2 onion, diced Preparation
Heat the oil in a heavy-bottom skillet on medium heat. Add chicken fat and salt, reduce heat to medium-low, and cook, stirring frequently, until crisp and browned, about 15–20 m (reduce heat to low if browning too fast or if rendered fat begins to smoke). Remove cracklings with a slotted spoon, and reserve. Add onion to skillet with rendered fat, and cook on low to medium-low until caramelized, about 15 m. When done, remove from heat, and stir in cracklings. Pour into a glass jar, and store in refrigerator.
Schmaltz and gribenes are delicious when spread on black bread and sprinkled with coarse salt. They also make a good topping for mashed or baked potatoes and a tasty stir-in for cooked buckwheat groats.
Ukrainian-Style Hot Borscht (Beet Soup) with Beef recipe courtesy of Irina Vodonos's class on European winter soups at The Pantry at Delancey
yield: 6–8 servings Ingredient 1–2 lb meaty cut of bone-in beef (e.g., cross-cut shank, chuck roast, or chuck steak) 2 T sunflower or other oil 1/4 onion, diced 1 carrot, coarsely grated 1 small beet, peeled and coarsely grated 1 medium tomato, chopped into 1/2-inch pieces or 1 T tomato paste (optional) 3–4 yellow potatoes, peeled and cut into 1/2-inch chunks 1/2 cabbage, shredded or chopped into 1/2-inc pieces 3 cloves garlic, crushed 3-inch piece of salted pork fatback (or salted pork belly or bacon—fatty part only) mashed or grated into a paste 2–3 bay leaves sugar, to taste freshly ground black pepper, to taste kosher salt, to taste lemon juice, to taste sour cream, for garnish chopped fresh dill and/or parsley, for garnish Preparation
Place the meat in a pot, cover with 8 c cold water, and bring to a boil. Skim off foam, reduce heat to a simmer, and cook 'til tender. Depending on cut of meat, this can take 45 minutes to 1 1/2 hours. Remove from heat, remove meat from broth, and set aside. When meat is cool enough to handle, cut it off the bone, chop into 1-inch pieces, and return it to broth.
Heat the oil in a medium-sized skillet. Add the onion, and sauté on medium heat, stirring, until lightly browned and translucent, about 5 m. Add the carrot, and cook another 1–2 m. Add the beets, and cook 1–2 m. If using fresh tomatoes or tomato paste, add them now, and cook another 1–2 m. Season with a bit of salt, sugar, and ground black pepper.
Add the sautéed vegetable mix, cabbage, and potatoes to the broth, and bring mixture back to a boil. Reduce heat to a simmer, and cook, until potatoes and cabbage are almost tender, about 15 m. Add bay leaf, and cook another 5 m or until potatoes and cabbage are done. Turn off heat.
In a small bowl, combine garlic and pork fatback, and mix well. Stir the mixture into the soup. Season with salt, sugar, lemon juice, and ground black pepper to taste. (Borscht should taste savory, with a noticeable tang and just a hint of sweetness.)
Let borscht sit overnight if possible before serving. Serve hot, topped with sour cream and herbs if desired.
wrong season, i know, summer buddies, but still worth posting, really, any time. Shchi (Cabbage Soup) with Sauerkraut recipe courtesy of Irina Vodonos's class on European winter soups at The Pantry at Delancey Note: Shchi is pronounced shee. yield: 6–8 servings
Ingredients 3 yellow potatoes, peeled and cut into 1/2-inch cubes 2 c homemade Russian-style sauerkraut (recipe below), drained, lightly packed 1/2 onion, trimmed and peeled 1 small parsnip and/or a 3–4-inch piece of celery root, peeled and cut into matchsticks 1 carrot, coarsely grated (optional) 2 Roma tomatoes, quartered or coarsely chopped 2–3 cloves garlic, minced or crushed 1 small bunch dill, minced 2–3 bay leaves freshly ground black pepper, to taste kosher salt, to taste sugar, to taste (optional) Preparation
Place potatoes, sauerkraut, onion, parsnips/celery root, and carrot (if using) into a pot with 8 c cold water, and bring to a boil over high heat.
Reduce heat to a simmer, add tomatoes, and cook until potatoes are tender, about 30 m. Add garlic, dill, and bay leaves, and simmer another 5 m.
Season with a few grinds of black pepper. Taste, and add salt if needed, as well as a bit of sugar if deseried to balance out the taste. (The soup should taste tangy and salty, not sweet.) Remove and discard the onion and bay leaves before serving.
Russian-Style Sauerkraut recipe courtesy of Sergey Kushnareve and Irina Vodonos from Vodonos's class on European winter soups at The Pantry at Delancey
yield: about 1 1/4 quarts
Ingredients 1 head firm green cabbage, shredded or chopped into 1/2-inch pieces carrot, coarsely grated 1 1/2 to 2 T kosher salt Preparation
In a large, deep glass or enamel bowl or stockpot, combine cabbage, carrots, and 1 1/2 T kosher salt, and massage thoroughly with clean hands, rubbing the salt into the cabbage. Taste, and add more salt if needed; mixture should taste saltier than a typical salad but not so salty that it is unpalatable. Pack down tightly, and top with a clean plate that fits inside the bowl or stockpot and is large enough to cover most of the exposed surface of the cabbage. (Alternately, pack into a clean glass jar, and cover with a small saucer that fits inside the jar, or a cabbage leaf.) Place a clean, heavy weight (e.g., a large jar filled with water) on top of the plate, and press down carefully. The cabbage should release a small amount of juice; if it does not, remove weight and plate, and continue massaging the cabbage until it does.
Let cabbage sit at room temperature, away from direct light and heat. Once a day, remove weight and plate, and use a long, clean stick to poke holes in the cabbage all the way through to the bottom of the container to release trapped gases. When done, replace the plate and weight on top. Cabbage will release more juice with each day of fermentation; remove and discard extra juice if it starts flowing over the top of the container.
Taste after 3 days, and continue tasting until done. Sauerkraut should taste fermented and tangy when ready. Pack finished sauerkraut into clean glass jars. Cover and store refrigerated for 2–3 months, or freeze for extended storage.
Use sauerkraut in soups such as shchi (above) or borscht, or serve in place of salad or condiment with meat or fish. Sauerkraut can be served plain or dressed with one or more of the following: sunflower, olive, or other oil; a bit of sugar; diced onion; diced or grated apple; cranberries (also try adding these to cabbage before fermentation; grapes; and raisins.